Weekend Learning: Day 2 – Resume Windows Server Configuration after Restart using userdata in AWS using PowerShell

In my previous blog post we saw how to deploy a EC2 Instance, stop, start and finally terminate it using PowerShell. Here is the link to it just in-case you missed it : Weekend Learning: Day 1 – Deploy in AWS using PowerShell
When deploying AWS EC2 Instance for an organization it is always good to have it configured almost similar to your server in your own datacenter. Like have your organizations hostname schema, install any standard configuration management agents (HPE Server Automation agent or SCCM agent or Puppet agent etc.) that your organization is using etc. (Note you need to take care of the communication between the respective agent and there server. That is out of scope for this post.)
To perform such customization when you launch an instance in Amazon EC2, you have the option of passing user data to the instance that can be used to perform common automated configuration tasks and even run scripts after the instance starts for the first time.
By default user data is only triggered the first time the instance starts. But some tasks require a restart before the rest of the customization can be performed, like once the server hostname has been changed the server needs to be restart.
In today’s blog post we will take a look at how we can trigger configuration of the server using user data and continue from where it left off before the restart and yes using PowerShell !!
We will see how to do this on a Windows Server and here is the user data.
$UserData = [System.Convert]::ToBase64String([System.Text.Encoding]::ASCII.GetBytes(
@'
<powershell>
$path= 'HKLM:\Software\UserData'

if(!(Get-Item $Path -ErrorAction SilentlyContinue)) {
New-Item $Path
New-ItemProperty -Path $Path -Name RunCount -Value 0 -PropertyType dword
}

$runCount = Get-ItemProperty -Path $path -Name Runcount -ErrorAction SilentlyContinue |
Select-Object -ExpandProperty RunCount

if($runCount -ge 0) {
switch($runCount) {
0 {
#Increment the RunCount
Set-ItemProperty -Path $Path -Name RunCount -Value 1

#Enable user data
$EC2SettingsFile = "$env:ProgramFiles\Amazon\Ec2ConfigService\Settings\Config.xml"
$xml = [xml](Get-Content $EC2SettingsFile)
$xmlElement = $xml.get_DocumentElement()
$xmlElementToModify = $xmlElement.Plugins

foreach ($element in $xmlElementToModify.Plugin)
{
if ($element.name -eq "Ec2HandleUserData")
{
$element.State="Enabled"
}
}
$xml.Save($EC2SettingsFile)

#Rename Server and Restart
Rename-Computer -NewName DMTEST -Restart
}
1 {
#Increment the RunCount
Set-ItemProperty -Path $Path -Name RunCount -Value 2

#Enable user data
$EC2SettingsFile = "$env:ProgramFiles\Amazon\Ec2ConfigService\Settings\Config.xml"
$xml = [xml](Get-Content $EC2SettingsFile)
$xmlElement = $xml.get_DocumentElement()
$xmlElementToModify = $xmlElement.Plugins

foreach ($element in $xmlElementToModify.Plugin)
{
if ($element.name -eq "Ec2HandleUserData")
{
$element.State="Enabled"
}
}
$xml.Save($EC2SettingsFile)

#Change the local admin password
([adsi]("WinNT://$env:COMPUTERNAME/administrator, user")).psbase.invoke('SetPassword', 'DMAWSP@ssw0rd')

#Restart
Restart-Computer
}
2 {
#Install Windows Feature
Install-WindowsFeature -Name NET-Framework-Core
}
}
}
</powershell>
'@
))
I am using a variable called UserData and putting the complete code into it so that I can pass this as a parameter into -Userdata parameter in New-EC2Instance command-let.
Now let me explain the code inside the Userdata Variable, I am using the registry path ‘HKLM:\Software\UserData’ to add a key called RunCount with value 0 to start of with. This key will be used to keep track of current section of the script.
Each time the script runs I look up for the value in RunCount and pass it to switch case and based on value it will run the specific section. In each section I update the run count to the next section.
Next I read the config.xml file for EC2ConfigService available in “%ProgramFiles%\Amazon\Ec2ConfigService\Settings” folder and set the Ec2HandleUserData to Enabled. What this does is it ensures that user data is run again after the server restarts.
Then I run the command for example here Rename-Computer and then restart it. When the server restarts, user data we passed initially will run again which will look into the RunCount registry key and then go to the specific switch case and run. This way you can add enough reboots and continue from the next section.
One thing you  will notice is that in the last switch case section I do not update the RunCount Registry and the Config.xml file for EC2ConfigService and that is how I exit out of the user data execution.
That brings us to the end of today’s blog Post. In the upcoming blog post we will do more automation tasks in AWS using PowerShell..

!! Preenesh

Posted in Powershell | Tagged , | Leave a comment

Weekend Learning: Day 1 – Deploy in AWS using PowerShell

Today’s post I will start by setting up PowerShell and use it to deploy a EC2 Instance, stopping, starting and finally terminating it. Yes all using PowerShell.
You need to have an AWS Account and would need the AccessKey & SecretKey of the account that you would like to use.
To get your access key ID and secret access key, Login to your AWS Account. Open the IAM console from the navigation menu, click Users. Select your IAM user name Click User Actions, and then click Manage Access Keys. Click Create Access Key.
You would also need AWS Tool for Windows PowerShell, you could google for it download and install it on a machine with PowerShell version 2 or higher (I am using version 5).
Ok, So lets get started !!
First Step is to Import AWS PowerShell Module and we can do that by running the following command
# Import AWS PowerShell Module
Import-Module AWSPowerShell
Lets check to see if the AWS Powershell Module is imported and working, I like to do this by run the below command to get the AWS Regions.
# Get AWS Region
Get-AWSRegion

get-awsregion

AWS Powershell Module provide a way to store access key ID and secret access key into the credential store and assign it a profile name, here it is called DMPSH. Command takes 3 Mandatory Parameters, -StoreAs this is the profile name, -AccessKey which is your access key ID and -SecretKey this is the secret key for your access key ID.
I have saved my access key ID and secret access key into variable $AccessKey and $SecretKey so that I can avoid showing you my keys in plain text here.
#Setup Profile with AWS Credentials
Set-AWSCredentials -StoreAs DMPSH -AccessKey $AccessKey -SecretKey $SecretKey
By setting up a profile, you can use the profilename parameter instead of passing the Accesskey and SecretKey  as parameters for the AWS commands.
Next we need to find the available AMI in my region, the region that is closest to where I am is Mumbai which is ap-south-1. We can do that by running the below command with the -Region parameter.
#Get Windows AMI by name in Mumbai
Get-EC2ImageByName -Region ap-south-1
get-ec2imagebyname
You can see that this will list only Windows AMI, to get RHEL AMI we will need to use the below command and filter the Name with RHEL , we will also need to pass the -Profilename Parameter to authenticate to AWS and – Region.
#Get RHEL AMI by name in Mumbai
Get-EC2Image -Filter @{Name="name";Values="RHEL-*"} -ProfileName DMPSH -Region ap-south-1 | Select-Object -Property Name

get-ec2imagerhel

Before we can deploy an EC2 Instance we need a couple more things, One is an Keypair that will be used to encrypt the Administrator password and the AMI ID.
I will first create the keypair and then store the Key to a file using the below command, so that I can use them in a future post.
#create a KeyPair, this is used to encrypt the Administrator password.
$mumbaikey = New-EC2KeyPair -KeyName mumbai-key -ProfileName DMPSH -Region ap-south-1

# Save the KeyPair to a File
$folder = "G:\AWS Powershell"
"$($mumbaikey.KeyMaterial)" | out-file -encoding ascii -filepath $folder\mumbaikey.pem
"KeyName: $($mumbaikey.KeyName)" | out-file -encoding ascii -filepath $folder\mumbaikey.pem -Append
"KeyFingerprint: $($mumbaikey.KeyFingerprint)" | out-file -encoding ascii -filepath $folder\mumbaikey.pem -Append
Next I need the AMI Id, I want to deploy an Windows Server 2012 R2 Server. Running the below command and assigning it to a variable will save the AMI Id into a variable called $ami
#Get AMI Id for Windows Server 2012 R2
$ami = Get-EC2ImageByName WINDOWS_2012R2_BASE -ProfileName DMPSH -Region ap-south-1 | Select-Object -First 1 -ExpandProperty ImageId
$ami

amiid

One last thing, we need to have a way to know what is the Status of the deployment. For that I have written the below function that takes 4 parameters the instanceid, ProfileName, AWS Region and Desired State of the Instance like running, stopped etc.
# Wait until desired state of an instance
function Wait-DMAWSState ($instanceId, $DMProfileName, $DMRegion, $desiredstate)
{
    while ($true)
    {
        # Get the Instance
        $a = Get-EC2Instance -Filter @{Name = "instance-id"; Values = $instanceId} -ProfileName $DMProfileName -Region $DMRegion
        # Get the Current State of the Instance
        $currentstate = $a.Instances[0].State.Name
        #Check if the Instance is in the desired State
        if ($currentstate -eq $desiredstate)
        {
            Write-Output "$(Get-Date) Instance $instanceId is $currentstate"
            break;
        }
        Write-Output "$(Get-Date) Current State of Instance $instanceId is $currentstate, Waiting to be $desiredstate"
        Sleep -Seconds 5
    }
}
Now that we have everything that we need, Lets go ahead and deploy an Windows EC2 Instance
# Deploy EC2 Instance and Pass the Instances Property into variable
$newinst = New-EC2Instance -ImageId $ami -InstanceType t2.micro -KeyName mumbai-key -ProfileName DMPSH -Region ap-south-1 | Select-Object -ExpandProperty Instances
$newinst.InstanceId
Here is the instance id of the EC2 Instance we just deployed

instanceid

Lets quickly run the Function to check the desired status of the EC2 Instance, We need the Instance in running status
#Verify the Instance is Running
Wait-DMAWSState -instanceId $newinst.InstanceId -DMProfileName "DMPSH" -DMRegion "ap-south-1" -desiredstate "running"
You can see here that it is pending and then the state becomes running

initialstate

Here is a screen shot of AWS Console..

awsconsole

Now Lets Stop the EC2 Instance and also run the function to check the desired status of stopped at once.
#Stop the EC2 Instance
Stop-EC2Instance -InstanceId $newinst.InstanceId -ProfileName DMPSH -Region ap-south-1
#Verify the Instance is Stopped
Wait-DMAWSState -instanceId $newinst.InstanceId -DMProfileName "DMPSH" -DMRegion "ap-south-1" -desiredstate "stopped"

stopinstance

stopconsole

Lets Start the Instance back up..
#Start the EC2 Instance
Start-EC2Instance -InstanceId $newinst.InstanceId -ProfileName DMPSH -Region ap-south-1
#Verify the Instance is Running
Wait-DMAWSState -instanceId $newinst.InstanceId -DMProfileName "DMPSH" -DMRegion "ap-south-1" -desiredstate "running"

startinstance

Finally lets Terminate the EC2 Instance..
#Terminate the EC2 Instance
Remove-EC2Instance -InstanceId $newinst.InstanceId -ProfileName DMPSH -Region ap-south-1 -Confirm:$false
#Verify the Instance is terminated
Wait-DMAWSState -instanceId $newinst.InstanceId -DMProfileName "DMPSH" -DMRegion "ap-south-1" -desiredstate "terminated"

terminateinstance

terminateconsole

That brings us to the end of today’s blog Post. In the upcoming blog post we will do more advance tasks in AWS using PowerShell..

!! Preenesh

Posted in Powershell | Tagged , | 1 Comment

Change CD/DVD Drive Letter using Powershell

Every organization has a standard for the way they configure or assign drive letter to CD/DVD Drive. During Windows OS deployment CD/DVD Drive are assigned the next available drive letter once the OS is applied.
Easy way to change the drive letter would be to run a Powershell Script as part of OS Deployment. Here is the Script, it takes a Mandatory Input – DriveLetter and have tested it on Windows Server 2008 R2 and Windows Server 2012 R2.
[CmdletBinding()]
Param(
[Parameter(Mandatory=$True,
Position=1)]
[string]
[ValidatePattern("^[A-Z]{1}:{1}`$")]$NewDrvLetter
)
# Get Available CD/DVD Drive - Drive Type 5
$DvdDrv = Get-WmiObject -Class Win32_Volume -Filter "DriveType=5"

# Check if CD/DVD Drive is Available
if ($DvdDrv -ne $null)
{

# Get Current Drive Letter for CD/DVD Drive
$DvdDrvLetter = $DvdDrv | Select-Object -ExpandProperty DriveLetter
Write-Output "Current CD/DVD Drive Letter is $DvdDrvLetter"

# Confirm New Drive Letter is NOT used
if (-not (Test-Path -Path $NewDrvLetter))
{

# Change CD/DVD Drive Letter
$DvdDrv | Set-WmiInstance -Arguments @{DriveLetter="$NewDrvLetter"}
Write-Output "Updated CD/DVD Drive Letter as $NewDrvLetter"
}
else
{
Write-Output "Error: Drive Letter $NewDrvLetter Already In Use"
}
}
else
{
Write-Output "Error: No CD/DVD Drive Available !!"
}

change-driveletter

!! Preenesh

Posted in Powershell | Tagged , , , | Leave a comment

Run command after sleep if previous execution of the command failed

There are times when you have to execute a command again after sleeping for a few seconds if the previous execution of the command did not give the desired output.
This is the quick and dirty way of getting this to work. I would not take complete credit of this as I had some help from Jonathan Warnken at powershell.org community. As an example I have used netdom command
# Set Number of retries, Delay
    $retries = 5
    $secondsDelay = 10
    $retrycount = 0
    $completed = $false
         
        while (-not $completed){
# Run Command and Pass the Output into a File
            & netdom Join $env:COMPUTERNAME /PasswordM:$env:COMPUTERNAME$ /Domain:DM.COM\RODC0001.dm.com /ReadOnly | Out-File "C:\Join.txt"
            $a = Get-Content -Path "C:\Join.txt"
# Verify the command was successful
            if ($a -eq "The command complete successfully."){
                Write-Output ("Command succeeded.")
                $completed = $true
            }
# Sleep for few seconds and retry again until the retry count
            else                     
            {
                if ($retrycount -ge $retries){
                    Write-Output ("Command failed the maximum number of $retrycount times.")
                    break
                } else {
                    Write-Output ("Command failed. Retrying in $secondsDelay seconds.")
                    remove-item -path "C:\Join.txt" -force
                    Start-Sleep $secondsDelay
                    $retrycount++
                }
            }
    }
Here is the script in action:

Rerun_Cmd

!! Preenesh

Posted in Powershell | Tagged , , | Leave a comment

Configure Disk using DiskPart and Powershell in Windows Server 2008 R2

It been a while now, have been a bit “tied up.”
In today’s post we will take a look at a script that would help configure drive using DiskPart and Powershell on Windows Server 2008 R2. Before I started writing the script I tried searching online, did find a few of them. But it would work on a few and fail on a few randomly.
So I sat down and decided to write something that work on all of them. Even though the title says Windows Server 2008 R2 it works on Windows Server 2012 R2.
Here is the Script, it takes 4 Mandatory Input – DriveSize (In GB), DriveLetter, DriveType (GPT or MBR), Label


[CmdletBinding()]
 Param(
 [Parameter(Mandatory=$True,
 Position=1)]
 [int]$DriveSize,
 [Parameter(Mandatory=$True)]
 [string]$DriveLetter,
 [Parameter(Mandatory=$True)]
 [string]$DriveType,
 [Parameter(Mandatory=$True)]
 [string]$Label
 )

# Set Log Path
$Path = "C:\Logs\DiskConfig"

# Check Log Path exists and Create if it does not
If(-not(Test-Path -Path $Path))
 {
 New-Item -Path $Path -ItemType Directory -Force | Out-Null
 }

# Start Logging
Start-Transcript -Path "$Path\Log-$DriveLetter-Drive.txt"
Write-Output "Check Requested Drive Size"

# Confirm DiskSize is NOT Zero
If ($DriveSize -ne 0){
 Write-Output "Requested Drive Size is $DriveSize"
 
 # Confirm DiskType is GPT or MBR
 If (($DriveType -eq "GPT") -or ($DriveType -eq "MBR")){
 Write-Output "Listing All Drives"

 $dpscript = @"
 list disk
"@

 # Run Diskpart with list disk and Save the output into an array
 [array]$Temp = $dpscript | diskpart

 # Get all the lines starting with the word Disk into an array
 ForEach ($Line in $Temp){
 If ($Line.StartsWith(" Disk")){
 [array]$Disks += $Line
 }
 }

 # Get Total Number of Disk
 $DiskCount = $Disks.Count

 # Get DiskNumber, Size etc for each Disk into an Array
 For ($i=1;$i -le ($Disks.count-1);$i++){
 $currLine = $Disks[$i]
 $currLine -Match " Disk (?<disknum>...) +(?<sts>.............) +(?<sz>.......) +(?<fr>.......) +(?<dyn>...) +(?<gpt>...)" | Out-Null
 $DiskObj = New-Object PSObject
 Add-Member -InputObject $DiskObj -MemberType NoteProperty -Name "DiskNumber" -Value $Matches['disknum'].Trim()
 Add-Member -InputObject $DiskObj -MemberType NoteProperty -Name "Status" -Value $Matches['sts'].Trim()
 Add-Member -InputObject $DiskObj -MemberType NoteProperty -Name "Size" -Value $Matches['sz'].Trim()
 Add-Member -InputObject $DiskObj -MemberType NoteProperty -Name "Free" -Value $Matches['fr'].Trim()
 Add-Member -InputObject $DiskObj -MemberType NoteProperty -Name "Dyn" -Value $Matches['dyn'].Trim()
 Add-Member -InputObject $DiskObj -MemberType NoteProperty -Name "Gpt" -Value $Matches['gpt'].Trim()
 [array]$DiskResults += $DiskObj
 }

 # Check each Disk and Get DiskNumber that of requested size and offline
 Foreach ($DiskResult in $DiskResults){
 if($DiskResult.Size -eq "$DriveSize GB"){
 $DiskResult
 Foreach ($Disk in $DiskResult){
 # Check each Disk that is either offline or online and Free Disk space matches the requested Disk Size
 if(($Disk.Status -eq 'offline')-or($Disk.Status -eq 'online')-and($Disk.Free -eq "$DriveSize GB")){
 $DiskNum = $Disk.DiskNumber
 }
 }
 }
 }

 # Ensure that the DiskNumber is not Disk 0 which would be OS Disk
 Write-Output "Verifying if selected disk is OS Disk (Disk 0)"
 If($DiskNum -ne 0){
 
 # Create Diskpart Answer file
 Write-Output "Selected disk is Disk $DiskNum"
 Write-Output "Generating Answer file for Diskpart - $DriveLetter Drive"
 New-Item -Path "$Path\$DriveLetter-Drive.txt" -ItemType file -force | OUT-NULL
 ADD-CONTENT -Path "$Path\$DriveLetter-Drive.txt" -Value "SELECT DISK $DiskNum"
 ADD-CONTENT -Path "$Path\$DriveLetter-Drive.txt" -Value "ONLINE DISK NOERR"
 ADD-CONTENT -Path "$Path\$DriveLetter-Drive.txt" -Value "ATTRIBUTES DISK CLEAR READONLY"
 ADD-CONTENT -Path "$Path\$DriveLetter-Drive.txt" -Value "CONVERT $DriveType NOERR" 
 ADD-CONTENT -Path "$Path\$DriveLetter-Drive.txt" -Value "CREATE PARTITION PRIMARY" 
 ADD-CONTENT -Path "$Path\$DriveLetter-Drive.txt" -Value "FORMAT FS=NTFS LABEL='$Label' QUICK" 
 ADD-CONTENT -Path "$Path\$DriveLetter-Drive.txt" -Value "ASSIGN LETTER=$DriveLetter"
 Write-Output "Answer File for Diskpart generated Successfully"
 Write-Output "Running Diskpart with Answer File"
 
 # Run Diskpart with the Answer file generated as input
 DISKPART /S "$Path\$DriveLetter-Drive.txt"
 Write-Output "Drive Configuration Completed Successfully"
 }
 else{
 Write-Output "Selected disk is Disk $DiskNum which is OS Disk. No additional disk available."
 }
}
 else{
 Write-Output "Invalid DriveType - Requested DriveType is $DriveType - Skipping Drive Configuration"
 }
}
else{
Write-Output "Requested Drive Size is $DriveSize - Skipping Drive Configuration"
}
Stop-Transcript

Here is the script in action..

Config_Disk

!! Preenesh

Posted in Powershell | Tagged , , | Leave a comment

Install, Configure WSUS on Windows Server 2012 R2 and Approve Patches using Powershell – Part 2

Welcome back !! Yesterday we Installed, Configured WSUS and Synchronized our WSUS on Windows Server 2012 R2 using Powershell. Here is the link to it just in-case you missed it : Install, Configure WSUS on Windows Server 2012 R2 and Approve Patches using Powershell – Part 1
Today, we’ll learn how to Approve or Decline a list of Updates/Patches. Yes you read it right, I will show you how to do that using Powershell and before we conclude will show you some bonus command that you might find very useful.
Lets get started, by now the synchronization we started in the last post must have completed.
Let us approve some updates, I usually have a list of KB Numbers that I want to approve for specific Products/OS. I also exclude Itanium-based Updates, don’t think any one uses that. Have never seen an Itanium-based system in my 11 years of IT.
 We will save the list of KB Numbers into a text file and use the below Powershell Script to Approve them to “All Computers” Target Group. The script has 2 mandatory parameters -ProductName and -Path. I have two separate list of KB to approve for Windows Server 2008 R2 and Windows Server 2012 R2. -ProductName helps me to specify the Product. -Path helps to specify the file that contains the KB List. Have saved this script as “Approve-KBList.ps1”
[cmdletbinding()]
param(
   [Parameter(
   Mandatory = $True,
   Position=1)]
   [string]$ProductName,
   [Parameter(
   Mandatory = $True)]
   [string]$Path
   )
if(!(Test-Path -Path $Path))
   {
   Write-Verbose "$Path - File Does NOT Exist..!!" -Verbose
   Break
   }
else
   {
   $ApprovedKBs = Get-Content -Path $Path
   Write-Verbose "Processing Updates to Approve for $ProductName.. Please Wait.. This may take some time.." -Verbose
   Foreach ($ApprovedKB in $ApprovedKBs)
      {
      Get-WsusUpdate -Approval Unapproved | where {($_.update.title -match $ProductName) `
      -and ($_.update.title -match $ApprovedKB) `
      -and ($_.update.title -notmatch "Itanium-based")} `
      | Approve-WsusUpdate -Action Install -TargetGroupName "All Computers" –Verbose
      }
   Write-Verbose "Approved the updates for $ProductName" -Verbose
   }

WSUS_ApproveKB

We have now successfully approved a List KB for Windows Server 2008 R2.
Next lets Decline a few KB, We would use the below script to achieve that. The script has 2 mandatory parameters -ProductName and -DeclineKBs. -ProductName helps to specify the Product. -DeclineKBs helps to specify multiple KB Numbers separated by comma. Have saved this script as “Decline-KB.ps1”
[cmdletbinding()]
param(
   [Parameter(
   Mandatory = $True,
   Position=1)]
   [string]$ProductName,
   [Parameter(
   Mandatory = $True)]
   [string[]]$DeclineKBs
   )
Write-Verbose "Processing Updates to Decline for $ProductName.. Please Wait.. This may take some time.." -Verbose
Foreach ($DeclineKB in $DeclineKBs)
   {
   Get-WsusUpdate -Approval AnyExceptDeclined | where {($_.update.title -match $ProductName) `
   -and ($_.update.title -match $DeclineKB) `
   -and ($_.update.title -notmatch "Itanium-based")} `
   | Deny-WsusUpdate -Verbose
   }
Write-Verbose "Declined the updates for $ProductName" -Verbose

WSUS_DeclineKB

And that is how you Install, Configure WSUS on Windows Server 2012 R2 and Approve or Decline Patches using Powershell.

Now as promised here are the Bonus Command:

Create Computer Target called “Infrastructure Servers”
#Get WSUS Server Name
$WSUS = Get-WSUSServer
#Create Computer Target Group
$WSUS.CreateComputerTargetGroup("Infrastructure Servers")
Configure Automatic Synchronizations and Set synchronization scheduled for midnight each night
# Get WSUS Server Name
$WSUS = Get-WSUSServer
# Get WSUS Server Subscription Information
$WSUSSubScrip = $WSUS.GetSubscription()
# Configure Automatic Synchronizations
$WSUSSubScrip.SynchronizeAutomatically=$true
# Set synchronization scheduled for midnight each night
$WSUSSubScrip.SynchronizeAutomaticallyTimeOfDay= (New-TimeSpan -Hours 0)
$WSUSSubScrip.NumberOfSynchronizationsPerDay=1
$WSUSSubScrip.Save()
Only thing we had not done is Install Microsoft Report Viewer 2008 SP1 and .NET Framework 3.5 which is a prerequisite. So before we wrap this series up here is how you would do it using Powershell.
Install-WindowsFeature -Name NET-Framework-Core -Verbose
Write-Verbose&nbsp; "Downloading Microsoft Report Viewer" -Verbose
$url = "http://download.microsoft.com/download/3/a/e/3aeb7a63-ade6-48c2-9b6a-d3b6bed17fe9/ReportViewer.exe"
$TempDir = "${env:SystemDrive}" + "\Temp"
$CFld = New-Item -Force -ItemType directory -Path $TempDir
$output = "$TempDir\ReportViewer2008SP1.exe"
$webcli = New-Object System.Net.WebClient
$webcli.DownloadFile($url, $output)
Write-Verbose&nbsp; "Download Complete" -Verbose
Write-Verbose&nbsp; "Installing Microsoft Report Viewer" -Verbose
Start-Process -FilePath $output -Verb RunAs -ArgumentList '/q' -Wait
$RepVwr = Get-WmiObject -Class:Win32_Product -Filter "Name LIKE '%Microsoft Report Viewer%'" | Select-Object -ExpandProperty Name
Write-Verbose&nbsp; "$RepVwr INSTALLED..!!" -Verbose

WSUS_MSReportViewer

There you have it. Hope you enjoyed this series.

!! Preenesh

Posted in Powershell | Tagged , | Leave a comment

Install, Configure WSUS on Windows Server 2012 R2 and Approve Patches using Powershell – Part 1

There are times when you would want to setup a WSUS server in your Lab quickly.
As you might have already guessed this is going to be a 2 Part series, In this post will show you how to Install, Configure WSUS on Windows Server 2012 R2 using Powershell. I will break the script into parts to explain what we are getting done and will post the complete script at the end.
Alright then if you want to follow along this is what you would need, A Windows Server 2012 R2 machine with Internet.We are going to Install WSUS with Windows Internal Database. (Will write some thing later on how to set it up using SQL).
First let us Install Windows Update Services with Windows Internal Database (WID) and also Include Management Tools by running the below line.
Install-WindowsFeature -Name UpdateServices -IncludeManagementTools -Verbose
Install_WSUS_Powershell
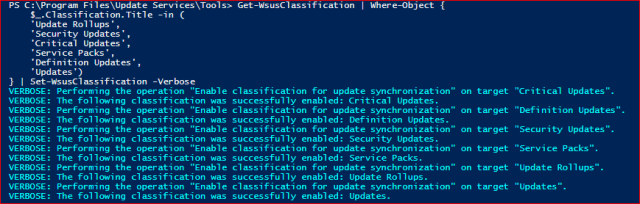
Wait for the Installation to complete. You can see, we have a message stating some additional configuration may be required before our WSUS server can be up and running. We still need to configure a location for the update files to be stored.This is where wsusutil.exe will come into play. This executable is located at C:\Program Files\Update Services\Tools. In wsusutil.exe there is a set of parameters that become available when you use the /PostInstall argument for specifying where to store the content. I don’t want all of the updates on my system drive, so I will create the folder on my E: drive and store them there.
New-Item -Name WSUS -Path E: -ItemType Directory
Set-Location $env:ProgramFiles'\Update Services\Tools'
.\WsusUtil.exe postinstall CONTENT_DIR='E:\WSUS'
Configure_WSUS_Powershell
We have now configured the content directory on E drive to save the update files under WSUS Folder.
Now lets configure the language pack, In this case we only want to enable English language pack for updates. We will next set that in the WSUS Server Configuration and Subscription Information.
#Get WSUS Server Name
$WSUS = Get-WSUSServer
#Get WSUS Server Configuration and Subscription Information
$WSUSConfig = $WSUS.GetConfiguration()
$WSUSSubScrip = $WSUS.GetSubscription()
#Set Update Language to English and save configuration settings
$WSUSConfig.AllUpdateLanguagesEnabled = $false
$WSUSConfig.AllUpdateLanguagesDssEnabled = $false
$WSUSConfig.SetEnabledUpdateLanguages("en")
$WSUSConfig.Save()
Next we will tell our server where we want to synchronize from, In this case we want to sync up with Microsoft Updates.
#Set WSUS to download from Microsoft Updates
Set-WsusServerSynchronization -SyncFromMU
Set_WSUS_UpdateServer_Powershell
By Default a list of Products and Classifications are enabled, Lets first disable All of them. We will enable just the ones we want later.
# Disable All Products and Classifications
Get-WsusClassification | Set-WsusClassification -Disable -Verbose
Get-WsusProduct | Set-WsusProduct -Disable -Verbose

Disable_WSUS_Products

Now that we have set our server to synchronize from Microsoft. We will Run the initial Synchronization For Category.
# Run the Initial Synchronization For Category
$WSUSSubScrip = $WSUS.GetSubscription()
$WSUSSubScrip.StartSynchronizationForCategoryOnly()
Write-Verbose "Sync Inprogress.." -Verbose
While($WSUSSubScrip.GetSynchronizationStatus() -ne 'NotProcessing') 
   {
   $WsusProd = (Get-WsusProduct).count
   Write-Verbose "Synchronized $WsusProd Products" -Verbose
   Start-Sleep -Seconds 10
   }
Write-Verbose "Synchronization Completed !!" -Verbose
Initial Synchronization For Category takes some time, So ahead and grab a coffee..
Inital_Sync_Category
Synchronization For Category has successfully completed. Next lets us Configure the Classifications, I usually select Update Rollups, Security Updates, Critical Updates, Service Packs, Definition Updates and Updates.
You could run Get-WsusClassification to get the list of available Classifications.
Get-WsusClassification | Where-Object {
   $_.Classification.Title -in (
   'Update Rollups',
   'Security Updates',
   'Critical Updates',
   'Service Packs',
   'Definition Updates',
   'Updates')
} | Set-WsusClassification -Verbose
WSUS_Select_Classification
Next we will configure the Products, I only have Windows Server 2008 R2 & Windows Server 2012 R2 in my lab so will only enable them.
You might run Get-WsusProduct to get the list of available Products and add the products you want for you environment.
Get-WsusProduct | where-Object {
   $_.Product.Title -in (
   'Windows Server 2008 R2',
   'Windows Server 2012 R2')
} | Set-WsusProduct -Verbose

WSUS_Select_Product

Finally lets kick-off a synchronization of the Classifications & Products.
$WSUSSubScrip.StartSynchronization()
While($WSUSSubScrip.GetSynchronizationStatus() -ne 'NotProcessing') 
{
   Start-Sleep -Seconds 10
   $Total = $WSUSSubScrip.GetSynchronizationProgress() | Select-Object -ExpandProperty TotalItems
   $Processed = $WSUSSubScrip.GetSynchronizationProgress() | Select-Object -ExpandProperty ProcessedItems
   $Phases = $WSUSSubScrip.GetSynchronizationProgress() | Select-Object -ExpandProperty Phase
   Write-Verbose "Synchronized $Processed of $Total $Phases" -Verbose
   Start-Sleep -Seconds 10
}
Write-Verbose "Synchronization Completed !!" -Verbose

WSUS_Sync_Updates

It may take a while to complete the synchronization depending on the speed of your Internet.
That is all for today’s blog about Install, Configure WSUS on Windows Server 2012 R2. In Part2 of this blog I will deal with Creating Computer Target Group and approve or decline updates.

!! Preenesh

Posted in Powershell | Tagged , | 1 Comment

Add Powershell Support to WinPE x86 & x64 in MDT

There are times when you would want to use Powershell or run a Powershell Script in MDT WinPE. Powershell support is available but is not enabled by default. This is how you enable it.
Launch Deployment Workbench, Open Properties of your Deployment Share and Click on Windows PE tab. Choose Platform x86 from the drop down. Select Features tab.
Enable .NET Framework and Windows Powershell

Powershell_x86

Choose Platform x64 from the drop down. Select Features tab and Enable .NET Framework and Windows Powershell. Click Apply.

Powershell_x64

Switch to the General tab and Ensure that you Enable the check box for both x86 and x64 in the Platform Supported Section and then click OK.

WinPEPlatform

Next right click on your deployment share and click on update deployment share and completely regenerate the Boot Images and click Finish when done.
Boot off the new WinPE ISO, Press F8 to launch command prompt. Run powershell.exe to launch powershell prompt.

Powershell_WinPEx64 Powershell_WinPEx86

!! Preenesh


Posted in MDT | Tagged , , | Leave a comment

Getting minimum Hardware info from HP iLO (No need for credentials)

Thanks to Mikael Nystrom from DeploymentBunny.com cause have added a few addition to his idea and script to work as per my requirement
In HP Servers there is something called iLO, what many people do not know is that you can reach basic information using a normal web browser with out providing credentials, like this:
Just browse to http://IPaddress/xmldata?item=All and you will see this

HP_iLO

The below script reads each and every IP from the input file “Serverlist.txt” (Create a Text File “Serverlist.txt” in the same path you save this script) , the first thing is to try to get the name from DNS, then confirms the connectivity with the ilo, then we load the XML data, we then convert, modify, bend and twist so it looks the way I need it and last we dump it in a CSV file.
<# 
Author : Preenesh Nayanasudhan 
Script : Ping Multiple servers iLO IP provided in Text file Serverlist.txt 
Purpose : iLO Test Experiment - Ping Multiple Servers iLO and publish the result in CSV 
Pre-requisite : Create a Text File Serverlist.txt in the same path you save this script 
#> 
 
# Input file 
$Servers = Get-Content "ServerList.txt" 
$report = @() 
 
ForEach ($server in $Servers) 
{ 
    $HostName = [System.Net.Dns]::GetHostEntry($server).hostname 
    if (test-Connection -ComputerName $server -Count 3 -Quiet ) 
    { 
        $iLOIP = $($server); 
        $PingResult = 'ILO is Alive and Pinging' 
        $XML = New-Object XML  
        $XML.Load("http://$server/xmldata?item=All") 
        $iLOSN = $($XML.RIMP.HSI.SBSN);
        $ServerType = $($XML.RIMP.HSI.SPN); 
        $ProductID = $($XML.RIMP.HSI.PRODUCTID); 
        $ILOType = $($XML.RIMP.MP.PN);  
        $iLOFirmware = $($XML.RIMP.MP.FWRI) 
        $tempreport = New-Object PSObject 
        $tempreport | Add-Member NoteProperty 'ILO IP' $server 
        $tempreport | Add-Member NoteProperty 'Ping Result' $PingResult 
        $tempreport | Add-Member NoteProperty 'ILO HostName' $HostName 
        $tempreport | Add-Member NoteProperty 'ILO Serial NUmber' $iLOSN  
        $tempreport | Add-Member NoteProperty 'Server Type' $ServerType 
        $tempreport | Add-Member NoteProperty 'Product ID' $ProductID 
        $tempreport | Add-Member NoteProperty 'ILO Type' $ILOType 
        $tempreport | Add-Member NoteProperty 'ILO Firmware' $iLOFirmware  
        $report += $tempreport 
    }  
    else  
        {  
        $iLOIP = $($server); 
        $PingResult = 'ILO Seems dead NOT Pinging' 
        $tempreport = New-Object PSObject 
        $tempreport | Add-Member NoteProperty 'ILO IP' $server 
        $tempreport | Add-Member NoteProperty 'Ping Result' $PingResult 
        $tempreport | Add-Member NoteProperty 'ILO HostName' $HostName 
        $report += $tempreport 
    } 
 } 
$report | Export-Csv -NoTypeInformation ('iLO_Timeout_Test.csv')

!! Preenesh

Posted in Powershell | Tagged | 3 Comments

Get Install Date & OS Version for a list of Servers provided in a text file

Get Install Date and OS Version for a list of Servers provided in a Text file and publish the result in CSV.
Script reads each and every IP/hostname from the inputfile “Serverlist.txt” (Create a Text File “Serverlist.txt” in the same path you save this script), checks if the IP/hostname can be reached. if it can be reached connects to WMI and collects the Install Date and OS Version (Caption) and we dump it in a CSV file in the same path where you have this script.
<# 
Author : Preenesh Nayanasudhan 
Script : Get Install Date and OS Version for list of Servers provided in Text file Serverlist.txt
Purpose : Get Install Date and OS Version for list of Servers provided in Text file and publish the result in CSV 
Pre-requisite : Create a Text File Serverlist.txt in the same path you save this script 
#>  
  
# Input File 
$Servers = Get-Content "ServerList.txt"  
$report = @() 
 
ForEach ($server in $Servers)  
{  
    #Test if computer is online      
    if (test-Connection -ComputerName $server -Count 3 -Quiet )  
    {  
        $PingResult = 'Server IS Pinging'         
        # Connect to WMI on remote machine to get the required information 
        $gwmios = Get-WmiObject -Class Win32_OperatingSystem -ComputerName $server  
        # Get the Install Date and Convert readable date & time format  
        $osidate = $gwmios.ConvertToDateTime($gwmios.InstallDate) 
        $osname = $gwmios.Caption 
        $tempreport = New-Object PSObject  
        $tempreport | Add-Member NoteProperty 'Server Name' $server 
        $tempreport | Add-Member NoteProperty 'Ping Result' $PingResult 
        $tempreport | Add-Member NoteProperty 'OS Version' $osname  
        $tempreport | Add-Member NoteProperty 'OS Install Date' $osidate 
        $report += $tempreport  
    }   
    else   
        {   
        $PingResult = 'Server NOT Pinging'  
        $tempreport = New-Object PSObject  
        $tempreport | Add-Member NoteProperty 'Server Name' $server 
        $tempreport | Add-Member NoteProperty 'Ping Result' $PingResult 
        $report += $tempreport  
    }    
}  
$report | Export-Csv -NoTypeInformation ('OSInstallDate.csv')

!! Preenesh

Posted in Powershell | Tagged | Leave a comment